Building a Serverless Webapp with Amplify and Quasar - Day 3
We have been helping a customer to build an internal application using AWS Amplify for all-in-one hosting as well as CI/CD and Quasar as an UI framework. This work has led to a Meet-Up (virtual of course) where I helped as AWS expert.
If you want to follow along, these are my notes from the third session.
I assume that you have setup your environment like I showed in the first article.
If not, clone my repository at branch day2 (git clone --branch day2 https://github.com/toelke/MyFirstQuasarAmplifyApp.git) and read the section how to set this up with your AWS account in the second article.
Moving the authentication state into the application-wide store
Last time we had created the variables holding the username and a flag wether we are logged in the MainLayout.vue.
This is not ideal from a modularization-standpoint, so let’s use the Vuex state manager.
For a full diff of that change see here.
We create a Vuex module called auth:
export default {
  namespaced: true,
  state: () => ({
    loggedIn: false,
    user: "",
    authState: '',
  }),
  mutations: {
    loggedIn: (state, lI) => { state.loggedIn = lI; },
    user: (state, u) => { state.user = u; },
    authState: (state, aS) => { state.authState = aS; }
  },
  actions: {},
  getters: {},
};
This holds the current username, the current state of the authentication and a flag loggedIn that is true when a user is logged in; we have three mutations, one for changing each state variable.
We moved all the code subscribing to onAuthUIStateChange into the App.vue-file and call the mutations from there:
created() {
  this.unsubscribeAuth = onAuthUIStateChange((authState, authData) => {
    this.$store.commit('auth/authState', authState);
    if (authState == "signedin") {
      this.$store.commit('auth/loggedIn', true);
      this.$store.commit('auth/user', authData.username);
    } else {
      this.$store.commit('auth/loggedIn', false);
      this.$store.commit('auth/user', "");
    }
  });
}
Now the MainLayout.vue can subscribe to the Vuex-state by using Vuex’ mapState-helper.
computed: mapState("auth", ["loggedIn", "user"])
Configuring i18n
When I created the Quasar-App on day 1, I opted to add “i18n” or internationalization.
This means that now my App has a member object called, suitably enough, $i18n.
It also has a member function called $t which is short for “translate”.
To have a tranlated string in your App, add it to the translations-“databases” in src/i18n/ and reference it like $t(logout').
export default {
  // ...
  logout: "Abmelden",
  // ...
}
I also added a menu that allows the user to select the language:
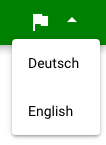
If you check the diff, you can see, that I store the selected language in the local storage of the browser:
if (localStorage.locale) this.$i18n.locale = localStorage.locale;
this.$watch("$i18n.locale", () => {
	localStorage.locale = this.$i18n.locale;
});
You can store arbitrary strings in localStorage and read them anytime.
To translate the amplify authentication UI, we have to change the strings in the object defined in this file.
Here, every string used by the UI is given an internal identifier.
I added a namespace to i18n and created all translations with the same identifier.
Then updating the translations becomes as easy as:
import { Translations } from "@aws-amplify/ui-components";

function updateTranslations() {
  for (const item in Translations) {
    Translations[item] = this.$t(`auth.${item}`);
  }
}
Unfortunately, the component is not reactive and does not change.
<amplify-authenticator
        :initial-auth-state="authenticatorState"
        username-alias="email"
        :key="$i18n.locale"
      >
By adding the key-attribute, we get Vue to re-instantiate the component when the selected locale changes.
To prevent the user to being sent back to the first page of the component (the signin) even then the user had previously selected (e.g.) the “forgot password”-page, we store the current state of the authenticator and pass it as initial-auth-state:
computed: {
    authenticatorState() {
      if (this.authState == "signin") return "signin";
      if (this.authState == "forgotpassword") return "forgotpassword";
      return "signup";
    },
  },
(authState is a variable from Vuex imported with mapState).
Adding storage and an API
For now we have basically not touched AWS (strange, given the URL you are reading this on), but this finally changes: We are adding our API (backed by AppSync and DynamoDB) and Storage (S3).
Execute amplify add storage:
? Please select from one of the below mentioned services: Content (Images, audio, video, etc.)
? Please provide a friendly name for your resource that will be used to label this category in the project: photoappstorage
? Please provide bucket name: myfirstquasaramplify2742289fca8a4356a2c93b0539a
? Who should have access: Auth users only
? What kind of access do you want for Authenticated users? create/update, read, delete
? Do you want to add a Lambda Trigger for your S3 Bucket? No
Successfully added resource photoappstorage locally
Please note that the “bucket name” needs to be globally unique (I accepted the default choice which looks random enough). The “friendly name for the resource” is internal to the Amplify project and should be something reasonable.
Now run amplify add api:
? Please select from one of the below mentioned services: GraphQL
? Provide API name: photoapp
? Choose the default authorization type for the API Amazon Cognito User Pool
Use a Cognito user pool configured as a part of this project.
? Do you want to configure advanced settings for the GraphQL API Yes, I want to make some additional changes.
? Configure additional auth types? Yes
? Choose the additional authorization types you want to configure for the API IAM
? Enable conflict detection? No
? Do you have an annotated GraphQL schema? No
? Choose a schema template: Single object with fields (e.g., “Todo” with ID, name, description)

The following types do not have '@auth' enabled. Consider using @auth with @model
         - Todo
Learn more about @auth here: https://docs.amplify.aws/cli/graphql-transformer/auth


GraphQL schema compiled successfully.

Edit your schema at /src/MyFirstQuasarAmplifyApp/amplify/backend/api/photoapp/schema.graphql or place .graphql files in a directory at /src/MyFirstQuasarAmplifyApp/amplify/backend/api/photoapp/schema
? Do you want to edit the schema now? No
Successfully added resource photoapp locally
Copy this schema to the path indicated:
type Album
  @model
  @auth( rules: [ { allow: owner } { allow: private, provider: iam, operations: [read, update] } ])
{
  id: ID!
  name: String!
  photos: [Photo] @connection(name: "AlbumPhotos", sortField: "id")
}

type Photo
  @model
  @auth( rules: [ { allow: owner } { allow: private, provider: iam, operations: [read, update] } ])
{
  id: ID!
  name: String!
  fullsize: S3Object!
  contentType: String
  album: Album @connection(name: "AlbumPhotos", sortField: "id")
}

type S3Object @aws_iam @aws_cognito_user_pools {
  region: String!
  bucket: String!
  key: String!
}
This will define two DynamoDB-Tables (see the @model annotation?).
However, since we are using GraphQL we will not need to thing about this.
When we call amplify push now, it will ask us if we want to create the glue-code to access the API from our App:
? Do you want to generate code for your newly created GraphQL API Yes
? Choose the code generation language target javascript
? Enter the file name pattern of graphql queries, mutations and subscriptions src/graphql/**/*.js
? Do you want to generate/update all possible GraphQL operations - queries, mutations and subscriptions Yes
? Enter maximum statement depth [increase from default if your schema is deeply nested] 4
Setting the maximum statement depth to 4 is not really ideal (it’s way too much), but unfortunately right now that’s the only way to get the list of Photos if we have the Album-id since the path is Album->photos->photo->fullsize.
There is an ongoing discussion about fixing this behaviour for lists in GraphQL.
Displaying all albums on the start page
Now that we actually have a way of getting a list of albums, we should show them. And give the user a way to create new albums and delete them again.
See here for the diff for this part.
We add a new model to Vuex for handling the knowledge about albums (and later photos):
import { API, graphqlOperation } from "aws-amplify";
import { listAlbums } from "src/graphql/queries";
import { createAlbum, deleteAlbum } from "src/graphql/mutations";

export default {
  namespaced: true,
  state: () => ({ albums: {} }),
  mutations: {
    setAlbums: (state, a) => {
      state.albums = a.reduce((map, obj) => (map[obj.id] = obj, map), {});
    },
  },
  actions: {
    async loadAlbums(context) {
      const albums = await API.graphql(graphqlOperation(listAlbums));
      context.commit("setAlbums", albums.data.listAlbums.items);
    },
    async createAlbum(context, name) {
      if (!name) return;
      await API.graphql(graphqlOperation(createAlbum, {input:{name: name}}));
      context.dispatch('loadAlbums');
    },
    async deleteAlbum(context, id) {
      await API.graphql(graphqlOperation(deleteAlbum, {input:{id: id}}));
      context.dispatch('loadAlbums');
    }
  },
  getters: {},
};
We have three Vuex-actions for loading a list of all albums, for creating an album and for deleting one. All they do is to make an GraphQL-API-Call and update a map of album-id to the album-model.
In the index-page of our App, defined in src/pages/Index.vue, we map those actions and the state:
  // ...
  computed: {
    ...mapState("photos", ["albums"]),
  },
  methods: {
    ...mapActions("photos", ["loadAlbums", "createAlbum", "deleteAlbum"]),
  },
  // ...
And then we can show a card per album (sorted by album name):
<q-card
  v-for="album_id in Object.keys(albums).sort((a, b) => albums[a].name > albums[b].name)"
  v-bind:key="album_id"
>
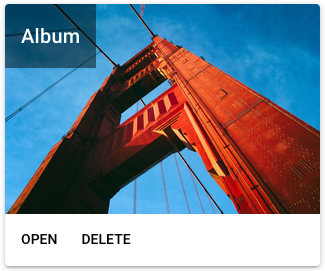
The “delete” button uses the Dialog plugin for Quasar to ask for confirmation:
$q.dialog({title: $t('reallydelete'),
		  message: $t('reallydeletealbum', {album: albums[album_id].name}),
		  cancel: true,
		  persistent: true,
}).onOk(() => deleteAlbum(album_id)
Only when the user clicks on “OK”, the album is deleted.
Uploading and displaying photos
Clicking on “Open” will lead the user to a new URL:
<q-btn :to="`/album/${album_id}`" flat>{{$t('open')}}</q-btn>
We need to tell Vue how to display that URL by configuring a route in src/router/routes.js:
{ path: 'album/:id', component: () => import('pages/Album.vue') },
This will render the page Album.vue and pass any ID from the URL to the component.
See this and the following changes here.
The component Album.vue immediately stores the Album-ID and loads the data from the API:
async mounted() {
  this.id = this.$route.params.id;
  this.album = await this.getAlbum(this.id);
}
Whenever this album member changes (e.g. when photos are added or deleted) the component needs to update its list of URLs for the images:
album: async function(n, o) {
    this.loaded_photos = {};
    let promises = [];
    const cap_this = this;
    for (const photo of n.photos.items) {
      promises.push(
        Storage.get(photo.fullsize.key, { level: 'protected' }).then(
          function(url) { cap_this.$set(cap_this.loaded_photos, photo.id, { name: photo.name, url }); }
        )
      );
    }
    await Promise.all(promises);
  }
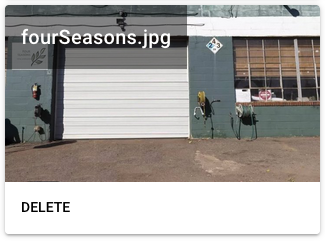
The component shows a card for every image that has been loaded like this, sorted by the file-name of the photo:
<q-card
  v-for="photo_id in Object.keys(loaded_photos).sort(
    (a, b) => loaded_photos[a].name > loaded_photos[b].name
  )"
  v-bind:key="photo_id"
>
  <q-img :src="loaded_photos[photo_id].url">
    <div style="absolute-bottom">
      <div class="text-h6">{{ loaded_photos[photo_id].name }}</div>
    </div>
  </q-img>
  ...
To upload an image, it needs to be transferred into S3 and then an Object has to be created in the database:
const id = uuid();
const extension = file.name.substr(file.name.lastIndexOf('.') + 1);
const key = `images/${id}.${extension}`;
Storage.put(key, file, {
  level: 'protected',
  contentType: file.mimeType,
}).then(function() {
  return API.graphql(
    graphqlOperation(createPhoto, {
      input: {
        id: id,
        name: file.name,
        fullsize: { region, bucket, key: key },
        photoAlbumId: cap_this.id
      }
    })
  );
});
(This is leaving out some code for showing a nice progress-bar to the user. Check the git for details).
Conclusion
This is as far as we brought the App during the MeetUps. Watch the Meetup Page for updates!
The next steps could be adding a lambda function to be triggered on upload that generates a smaller preview-image.
Take care!